Showing posts with label Sidebar. Show all posts

Wednesday, 10 April 2013

Labels!!

Hey Designers!! 
So , I've been asked many many times:
HOW DO I LABEL MY POSTS??
-=-=-=-=-
 Labeling your posts basically is putting several posts under a relating criteria.
Basically , labeling your posts is very beneficial , its a way of organizing your posts so it will make it easier to find.
 This post will show you how to create labels and how to label your posts and how to put them in your blog so that everyone could use them!
Like so,


Its simple and easy 

Creating Labels

Step 1:
Write your post 
Step 2: 
Once you are done , go to 'Post Settings' at either side of the page
It should look like the picture below 


One of the options is 'Labels'
Step 3:
Click 'Labels'
It should look like the picture below
  

Step 4:
Write your label
Step 5:
Click 'Save' or 'Publish' .. and you're DONE!


You can do this to previous posts by editing each post and doing the steps above OR by doing the following:

Labeling published posts...

Step 1:
Dashboard> Posts 


Step 2:
Select wanted posts 
Step 3:
Click the labels icon and choose or create your label

 You are DONE!


Labels on the Sidebar!

So you made your labels and you've labeled your posts and published them and everything,,
But you want your viewers to benefit from your labels , right?

How to put it on your sidebar?
The procedure is like adding any other widget to your side bar

Step1:
Go to Dashboard > Template

Step 2: 
Click 'Add a Gadget'

Step 3: 
Scroll down the pop-up window till you find 'Labels' , click it


Step 4:
 You can personalize how the widget will look and the order of the labels

Step 5:
Click 'Save' , then position your widget where ever you like on your sidebar 

Step 6:
Click 'Save Arrangement" at the top of the window

Step 7:
you are DONE!


Sorry I've lacked visual guide on the last one , its just because it's really simple and easy!
Anyways , hope this post helped!
If there are any questions , feel free to ask in the 'Ask Me' tab or in the comments below

hope this was helpful!


Saturday, 5 January 2013

New Websites!

I found two new websites in which you can find backgrounds for your blog and other stuff..

1. Artemisa 


You can find tutorials , blog backs , buttons and more!


2. BlogBulk 


There are tutorials , templates and lots of other stuff..! So cool!

Hope they are helpful! 

post signature

Friday, 28 September 2012

How to make your own sidebar tags/titles?

Well you surfed the net and the pre-designed tags are not how you want them to be , or not enough , or just not right , or they dont match your blog...
You want to make your own unique blog sidebar tags...

Start by thinking "How" you want them to be... in frame? frameless? with background? no/transparent background? what color do you want it to be?

Then go to fotoflexer and design it ..

Upload a photo , any photo! If you dont have a specific photo that you want to use for all of your tags.

Resize it!
For my blog I used 190x110 It fits my side bar , but you dont have to worry if its a little big , or small , blogger provides a "Shrink to fit" check box anyway.

If you uploaded any photo , you can erase it . Then you'll get a transparent plane where you can do anything with it!

Go to the "Decorate" tab > "Erase" button > Start erasing!


Then click Done! 

After you've erased your parts , or text ( If colored background you can color it using the "draw" button in the design tab , if you didnt find your color , you can search for your color digits online and insert it in the test box provided in the color area)

INSERT TEXT! 
On the same "decorate" tab , there is "text" , Insert your desired title for your gadget on your blog and decorate it ..

SAVE IT!
In "Format" make sure to choose the PNG format if you have a transparent image! 
Once you saved your tag click "Back to editor" button found on the top right of the page. 

Because you have more than one gadget , you want to make them as one set looking all the same , right? 
Just change the text and save it like you did to the first , then "Back to Editor" ... etc. Do that till you finish all your titles! 

How to upload the image to your blog , you can follow up the tutorial here.

** You can decorate your tags at fotoflexer by adding stickers and frames!
** To ANIMATE your tag you can upload multiple pictures (same size) to gickr.com


How to make side-bar tags?


So you've decide you would like to spice up your blog with a few fancy sidebar tags or images but just can't quite figure out how to accomplish it... well, no problem. Here are some helpful instructions to get you on your way....

{Before you start: There are a few things we'll need to do before we start...

1. For this tutorial you will need a selection of sidebar tags or images. You can find sets on Shabby blogs or you can make your own (to see how to make your own go here) Be sure you've already downloaded the tags you want to use on your blog by clicking on the download button . I like to save mine to my desktop so I can easily find them later.

2. Next, grab a blank piece of paper and pen/pencil and head over to your blog. Take a look around at the links, tags, and other goodies you have on your sidebars. Now is the time to decide what tags you'll want to use from the set you downloaded. Make sure to write down the order of the titles!

--------- START -------


*Begin by logging into your blog.

*Next click on "Design" found in the top right corner of your blog or navigate to your "Dashboard" and click on the "Design" tab.

Click on "Add a Gadget"...


Next scroll down to "Picture" and click the blue plus symbol...


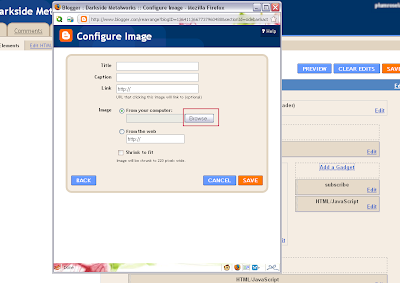
In the next pop-up window we will work with a few features. The first is to check the "shrink" box, this will ensure your image is as wide as your side bar...

Next click the "Browse" button and navigate to one of the frame images you have saved on your computer. Click on that image and then click "Open"...


After browsing your image and its loaded , g
o ahead and click "Save".

** Every gadget has a title , make sure to remove the title from the gadgets (you dont want 2 titles right?) and place the right image above the gadget! Make sure to not mix up the order of the images with the side bar!! 

Click SAVE!
With that done you can click "View Blog" to see how your new tag looks and check that the link work properly. You'll probably want to wait until all of your new tags are in place before you delete any of the preexisting links you had on your blog before. That way there's no confusion and the links are still there in case you wrote down an incorrect link.

With that you should be all set.